How to Make APNS Push Notifications in a Cordova iOS Application
It has been almost 2 years since I wrote this post about making push notification on Android with Google Cloud Messaging. This is its second logical part, which describes how to send pushes to an iOS application with Apple Push Notifications service (APNS). As previously, the process will be described in a context of Cordova application.
In order to build an application with push notification support, you need to keep in mind:
- A real iOS device is required. You cannot use push notifications, camera, microphone, and probably something else in a simulator.
- You need to be a member of Apple Developer Program. It costs $99 per year. Without membership, you are not going to be able to generate a key or certificate required for authentication.
Getting authentication keys from Apple
Before we move to receiving notifications, let’s do some preparation to sending them. This section will be more useful for back-end developers, so if you do not do server programming, you can skip this. However, I recommend reading this in order to fully understand how the things work.
Unlike the case with GCM, where we had to use the “Authorization” header with a server key, APNS requires authentication either with Apple Push Notification Authentication Key or Apple Push Notification service SSL certificate. The first method is much easier because the authentication key does not expire once in 2 years (this may suddenly break your application if you forget to update the certificate) and does not require conversion manipulation.
Authentication with a key
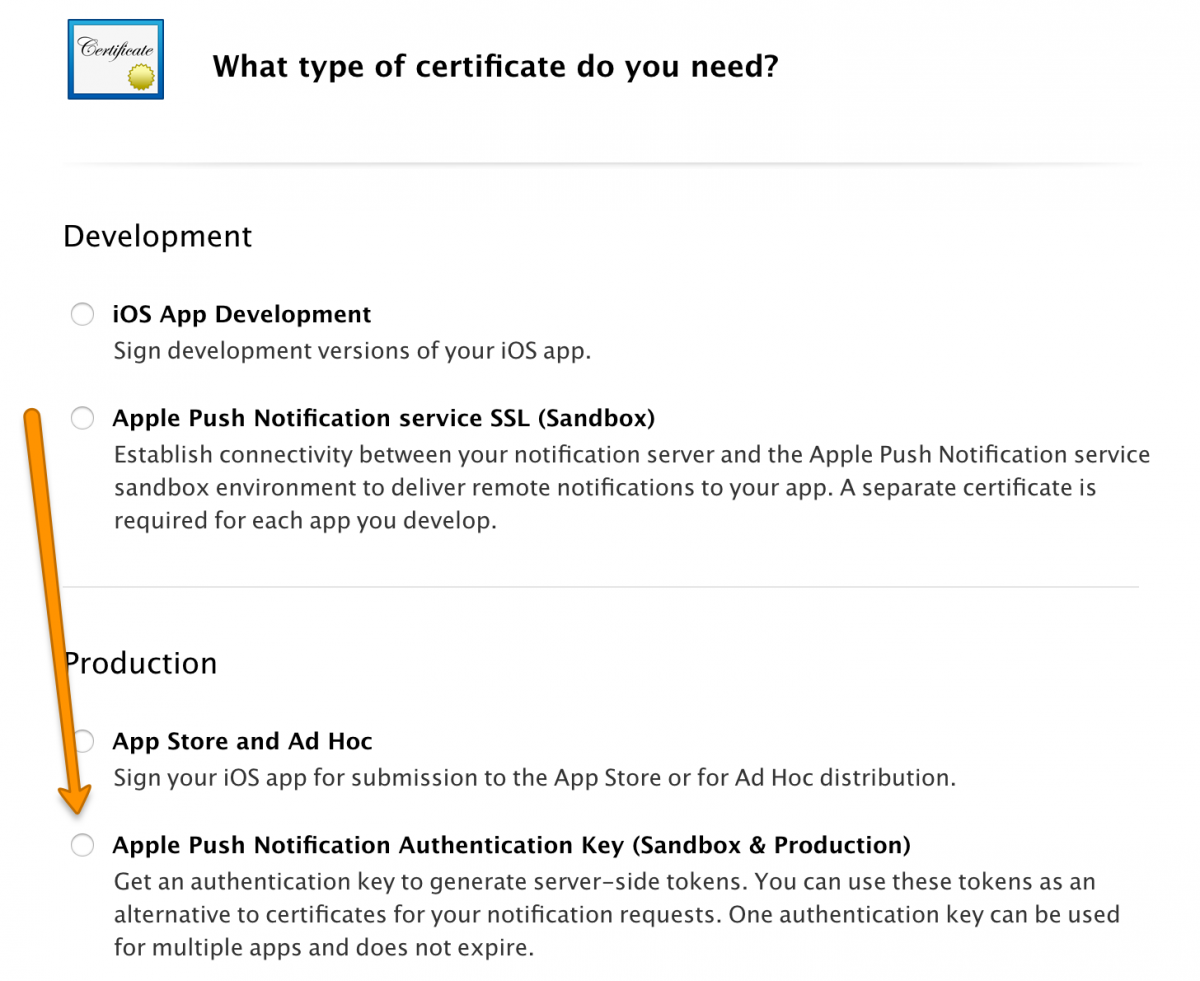
To generate your first authentication key, sign in to the Apple Developer Program portal, go to Certificates, IDs & Profiles, click on the “plus” button on the right top, and select “Apple Push Notification Authentication Key (Sandbox & Production)” in the production section.
You will be given only one chance to download the key, and once you use it, the download button will become disabled. Store the key is a safe place.
Authentication with a SSL certificate
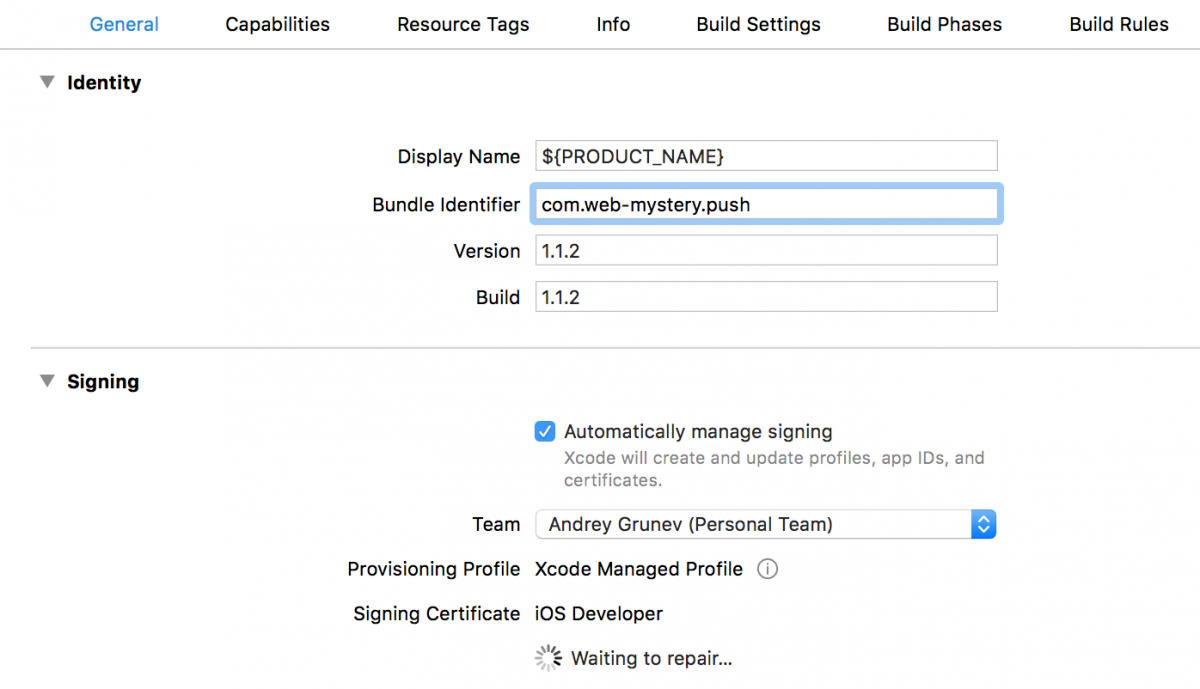
Another, rather old-fashioned, way to send pushes is using a SSL certificate. From the Add Certificate page, you can generate either a sandbox SSL certificate, which would work only for debug builds, or a “Sandbox & production” one. The “sandbox-only” option is probably useful in case when you hire a third-party developer and do not want to allow him send production pushes, but for simplicity sake, let’s choose the “Sandbox & production”. On the step 1, you will be asked to select the app ID to create a certificate for. Xcode has an option “Automatically manage signing”, which automatically creates App ID when you change it in the UI and takes care of all the signing routine, but it does not initially works with Cordova app. The easiest way to fix is to open the project in Xcode (platforms/ios/YourApp.xcodeproj), open the General tab of your target settings, check the aforementioned checkbox and wait until Xcode does it for you.
Another option is creating an App ID manually in the Apple Developer portal. Once you get this done, you will see your app’s ID in the dropdown. Select it and move to the next step, which has detailed instructions how to create a Certificate Signing Request using Keychain Access on your Mac. From here you need to:
- Create a CSR file, upload it to the portal, and download a certificate in .CER format
- Add it to Keychain Access by double clicking it, then find it in the list, right click on it, and select export. This would export the certificate in .P12 format.
- Convert the certificate to PEM. The PEM format is most common format, which can be used by most of applications. Open your terminal, move to the directory with the .P12 file, and execute the following command:
openssl pkcs12 -in <your_key_filename>.p12 -out <your_key_filename>.pem -nodes -clcerts. The converted file will available in the same directory.
Now the preparation is over, and we are ready to move forward. Examples on now to send a push notification with Node JS using both methods will be given at the end of this article.
Receiving APNS notification
As previously with Android, we will be using Phonegap Plugin Push, as this is the only well written Cordova plugin for pushes. Install it with the following console command:
cordova plugin add phonegap-plugin-push
After successful installation, you are going to be able to register and receive push notifications, using the window.PushNotification object. This is a simplified example of your client code:
let push = window.PushNotification.init({
    'ios': {
        'alert': 'true',
        'badge': 'true',
        'sound': 'true',
    },
});

push.on('registration', (data) => {
    // Device ID is available in data.registrationId

    // Pass the registration to your backend,
    // so that it knows where to send notifications.
    const payload =  {deviceId: data.registrationId};
    $http.post('https://yoursite.com/push', payload).then((response) => {
        console.log(response);
    });
});

push.on('notification', (data) => {
    // This callback is triggered when a notification arrives.
    // All custom keys are available in data.additionalData.
    console.log(data);
});

push.on('error', (e) => {
    // Triggered when an error occures.
    console.error('Push notifications error', e);
});
The full description of all properties and events are available in the detailed plugin documentation.
Testing APNS push notifications
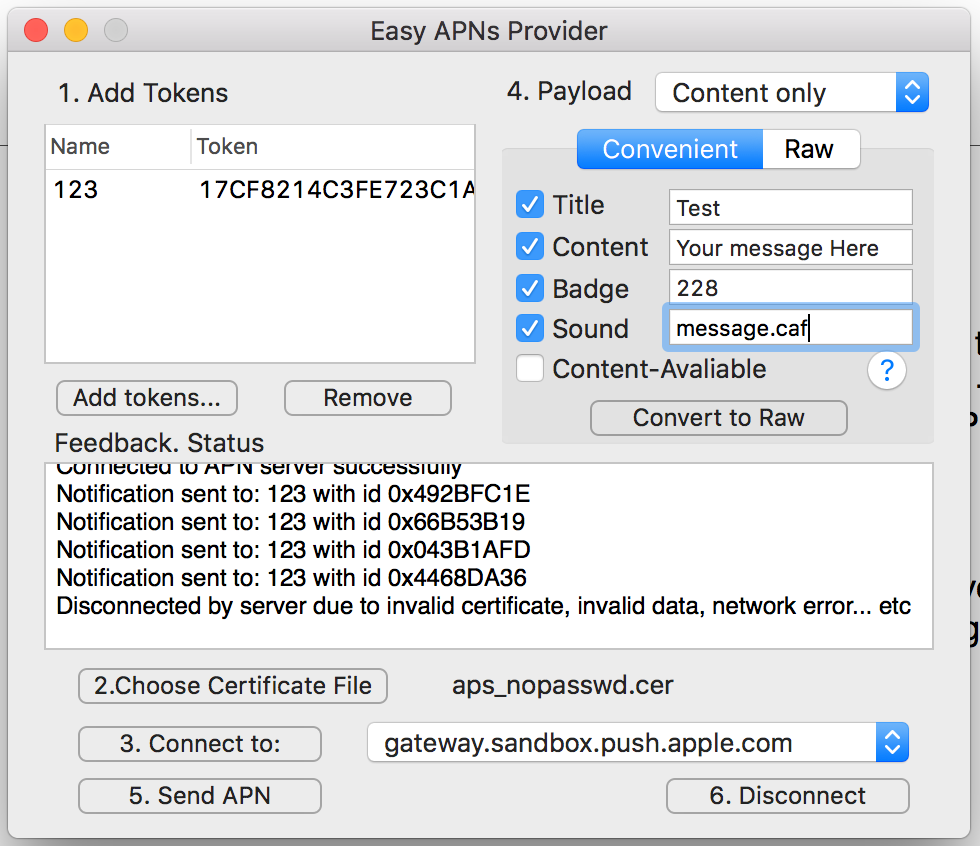
If you need to test your Cordova application behavior on push notification, but the backend implementation is not yet ready, get the “Easy APN Provider”. This is a completely free application, which is available in the AppStore. To use it, follow these simple steps:
- Choose a certificate file. The initially downloaded file with .cer extension is enough, no PEM conversion required.
- Add a device token. It is exposed for your as data.registrationId in the “registration” callback, as noted above.
- Connect to APNS. Both sandbox and production are supported. Since we are in development phase, let’s choose the sandbox.
- Construct a payload. You can either use a convenient UI to construct alerts or use the Raw text editor. The latter allows to add any custom properties using JSON format.
- Press “Send APN”. If you did everything right, the notification will be shown on your phone instantly.
Note that the notification does not show up if your app is running on the foreground, but the “notification” callback is still triggered. If your application is running in the background, the notification does show up, but the callback will be triggered only when the app is brought back to foreground. If you need the notification to be passed instantly to the app, even if it is in background, use the “content-available: 1” flag in the “aps" section.
{
  "aps" : {
    "content-available" : 1,
    "alert" : {
      "title" : "Test",
      "body" : "Your message here."
    },
    "badge" : 9,
    "sound" : "default"
  }
}
Sending APNS notifications
And finally, let’s see how to send a push notification using Node JS. Create a new NPM project, Copy your certificate .P8 or .PEM file to its root folder, and install the "node-apn" plugin:
npm i apn —save
The sending process is really straightforward, so you’ll just put here a slightly modified original example:
const apn = require('apn');

const options = {
    token: {
        key: "your_key.p8", // Path to your auth key
        keyId: "XXXX12345", // Your key ID, find it in developer portal
        teamId: "12345XXXXX" // Your team ID, check developer portal
    },
    production: false
};

const apnProvider = new apn.Provider(options);

// Your device token from data.registrationId
const deviceToken = "3d7d5e74731...67f82e33668ae";

let note = new apn.Notification();

 // Expires 1 hour from now.
note.expiry = Math.floor(Date.now() / 1000) + 3600;

note.badge = 3;
note.sound = "message.caf";
note.alert = "\uD83D\uDCE7 \u2709 You have a new message";
note.payload = {'messageFrom': 'John Appleseed'};
note.topic = "com.web-mystery.push";

apnProvider.send(note, deviceToken).then((result) => {
    console.log(result);
});
This is an example for authentication with Apple Push Notification Authentication Key. If you decided to use SSL, modify the options in the following way:
const options = {
    cert: "your_cert.pem",
    key: "your_cert.pem",
    production: false
};
The converted .PEM file contains both certificate and private key, so we can just refer to the same file. Run the script with node index.js in the command line, and if everything went OK, you will see the notification on your iPhone or iPad.
Third-party Push-notification services
There are plenty of services like Amazon SNS or PubNub that allow sending push-notification to different platforms. All they do is providing a unified API for sending pushes to different platforms (Android, iOS, Windows, browsers, etc), making developers’ life much easier. The drawback is that all these services have some limitations (which can be extended with a paid plan), and if you are planning to make heavy use of push notifications, you’d better send them directly as described in this article. Eventually, the notifications will be sent in the native way (via FCM or APNS), so there is absolutely no difference for end customers.
VoIP push notifications
This guide does not cover Apple VoIP pushes — another important type of push notifications designed for Voice Over IP applications, which is not yet supported by phonegap-plugin-push. There is another plugin, cordova-ios-voip-push, but it is pretty basic, requires custom coding in Objective C, and has no integration with CallKit (the new great API for calling), so I ended up writing my own plugin with all required features in Swift.
Please let me know in comments if you are interested to read about it in a feature blog post or if you want me to publish it as a separate Cordova plugin. I hope you enjoyed this reading, have a nice day, and see you next time.