How to Make GCM Push Notifications in a Cordova Android Application
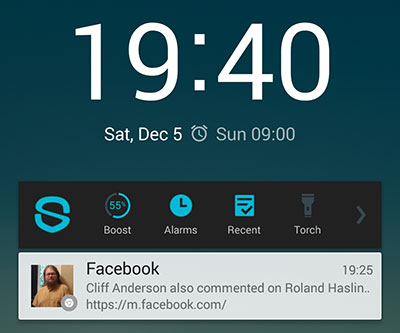
I guess you know perfectly well how your smart-phone reacts to news emails, IMs or anything else that needs your attention. Typically, it's a sound notification followed by a message appearing on your phone's top bar (or even on lock screen on Android 5+ devices). This is exactly what a push notifications is. In this article, I will explain how to implement such push notifications in a Cordova application and describe all the benefits they may give.
Cordova is a toolkit that gives a front-end developer possibilities to make like-native mobile application with HTML, CSS and JavaScript without knowledge of Java (Objective C, Swift, etc). With Cordova's numerous plugins, you can access many devices features (like file system, vibration, camera, push notifications indeed) that wouldn't be available from a browser. For more information, proceed to http://cordova.apache.org/, it has a good and comprehensive documentation.
What a Push Notification is
When it comes to implementing push notifications in a Cordova application, you have a choice between local and GCM (GCM stands for Google Cloud Messaging) notifications. Local notifications are much easier to implement – there is a plugin for that which is well-documented and easy to get started. The good part about local notifications is that they can be sent even if the device is being offline. However there is a significant drawback – they are sent within the application, which means that once the application is closed or a phone goes to sleep (and stop running the app), there's no way to notify. What if you need to instantly deliver a new message or any other important information to your users regardless of phone or app state? Here Google Cloud Messaging comes to the rescue.
Google Cloud Messaging works in the following way:
- When an application starts, it subscribes to notifications from a specific sender making an HTTP request to Google servers.
- Google API returns a Registration ID – a string generated for a certain application on a certain device.
- The application passes the Registration ID to its remote servers, so that the back end knows how to send a notification to this specific device.
- When something worth notification happens (say, received incoming message for an offline user), back end sends an HTTP request to Google Cloud Messaging servers with the saved Registration ID and another information (notification title, message, image path or any custom keys that can be processed by the Cordova app).
- Google instantly delivers the notification to the device if the provided Registration ID is valid and the device has Internet access. If the device is offline, it would receive all the pending notifications once reconnected. In case of wrong Registration ID or any other errors, Google returns a corresponding response.
All Android devices keep a continuous connection to Google servers when they have Internet access. Even if your application is not running at the moment of the notification, the notification will be delivered and shown. Moreover, the target application could be started immediately. It works like magic and gives you a lot of possibilities in development.
Of course, there is an awesome Cordova plugin to handle GCM messages, but before we get to it, let's get registered with Google and get our unique Sender ID and API Key.
Creating a new Google Project
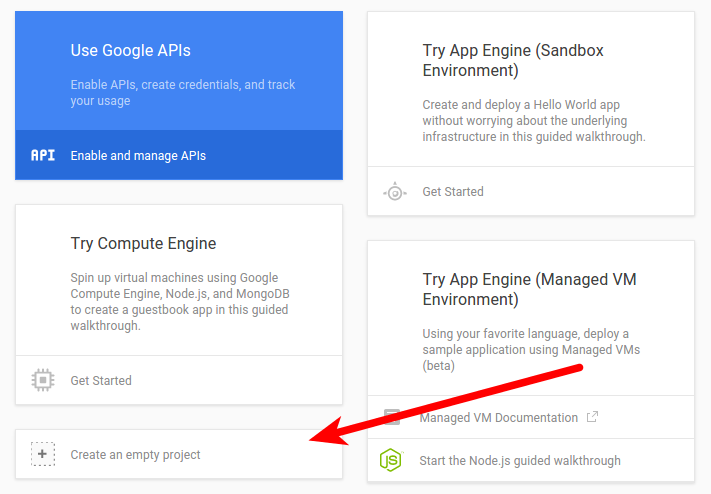
To start using Google Cloud Messaging, you have to register a new project in Google Developers Console first.

Sign in to your Google account and go to https://console.developers.google.com/. Click on the “Create the empty project button”, fill a pop-up form and watch your first project being created. Once done, you'll have its pane in the dashboard. Click on it to uncollapse and see the details. Pay a special attention to the Project Number (12 digits), copy and save it somewhere – this is the Sender ID, so necessary to get things done right.
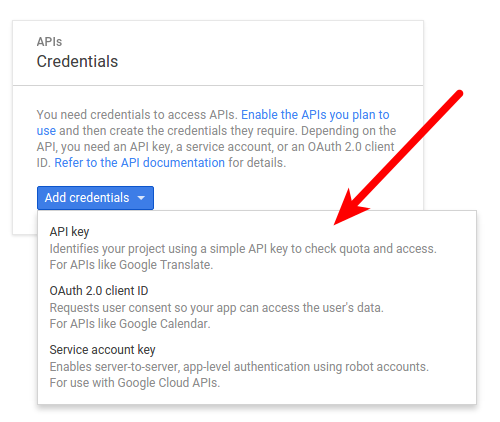
You need to enable Google Cloud Messaging API next. Click on the Enable and Manage API link (in the prominent blue box), search for “Google Cloud Messaging for Android” and click on “Enable API”. Once enabled, you'll get a notification that you cannot use the API without credentials, so click on “Go to Credentials” to create your API key that will be used by your back end for authorization in Google services. Choose the Server key, read how it is important to keep it safe, confirm creation and finally get your API Key string. Save it, and let's finally get to the code.
Receiving GCM notifications in Cordova Application
First of all, open your Android SDK, go to the Extra section and make sure that you have installed the following components:
- Android Support Library version 23 or greater
- Android Support Repository version 20 or greater
- Google Play Services version 27 or greater
- Google Repository version 22 or greater
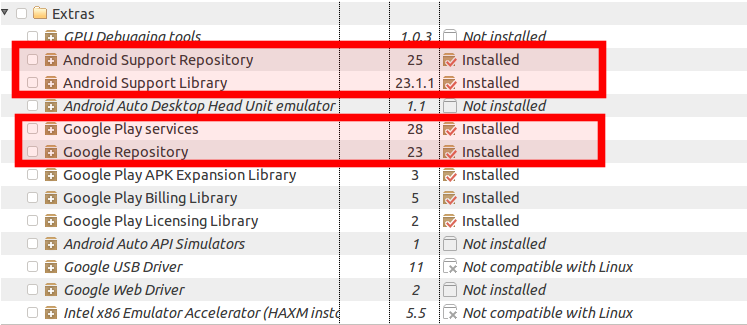
They are necessary to build and APK. If something is missing, download and install it right away.
There are two Cordova plugins for handling GCM notifications available: GCM Push Plugin and Phonegap Push Plugin. I was trying to make a build with the first one for about 5 hours, but every time something went wrong. Of course, I could've missed something crucial, no one is perfect, but I've read all the documentation and opened issues, edited .gradle files for dozens times, and it still didn't work. Phonegap Push Plugin didn't work either, but it started to work after removing “cordova-plugin-android-support-v4” (was required by another unnecessary plugin). It might be the reason why GCM Push Plugin refused to work as well, but I was so happy with being finally able to build an APK and didn't want to find out if it was true. That's how I ended up with Phonegap Push Plugin.
In order to subscribe for push notifications, you need the 12-digit Sender ID – you could request it from your back end or simply hardcode it.
Module's initialization
The initialization looks like the following:
var push = PushNotification.init({
  android: {
    senderID: sender_id,  // Your sender id variable
    icon: 'iconName',  // Small icon file name without extension
    iconColor: '#248BD0'  // Icon background color for Android 5 and newer
  }
});
Pay a special attention on the icon string as I find it confusing. Despite that fact that any PNG icon works well for Android 4, on Android 5 my app ended up with a white circle. That's because of material design which supposedly has some icon requirements. For me, it works only when I used a flat white PNG icon with transparent background. Considering that Skype and Chrome use the same icon styles, I assume that this is the only way to get it work on Android 5+. This icon is going to be used as a small icon for your notification (appears in the top bar and at the right bottom corner of a big icon) or as a big icon if the 'image' key is not specified (or a wrong path is given).
Another issue I faced was that the icon appeared cut on the top bar. The reason was in the wrong size of the small icon. By default, these icons are taken from the /CordovaProjectRoot/platfroms/android/res/drawable folder. However you can target devices with different pixel density by creating different folders following a naming convention: drawable-mdpi, drawable-hdpi, drawable-xhdpi, drawable-xxhdpi, etc. The image sizes for every pixel density are highly standardized. For full reference of icon sizes, please visit http://iconhandbook.co.uk/reference/chart/android/. Once I rewrote the existing images with the images of correct size, the problem was gone.
The init() method returned a new PushNotification object, which allows us to add listeners for certain events.
Successful registration with GSM servers
push.on('registration', function(data) {
  // RegID is available on data.registrationId
  // You may want to send it here to your server in an AJAX request.
});
Receiving a notification from GSM servers
push.on('notification', function(data) {
  // data - Data received from Google Cloud Messaging server.
  // All you custom keys are available in data.additionalData.
  // Write logic to process the notification here.
});
Note that notification will be fired only if the JSON-data received from GCM contains 'title', 'message' or both keys. If a push notification fired, the on('notification') handler will be called only when a user taps on notification. However, it would run immediately if the received data does not contain 'title' or 'message'.
Error handling
push.on('error', function(e) {
  // Do some stuff in case of errors.
  console.log(e.message);
});
If something goes wrong, you can hook into this event and do some recovery stuff.
Removing event listeners
What if you do need to listen to notifications at some point or change the callback function? For this, use the off() method.
push.off('notification', callback);
push.on('notification', newCallback);
I guess, you should keep callbacks in separate variables, so you could easily add and remove them at any point.
Unregistering
When you need to stop receiving GCM push notifications (for instance, when auser signs out from the app), do the following:
push.unregister(function() {
  console.log('Successfully unsubscribed');
}, function() {
  // Just in case something goes wrong
  console.log('error');
});
This will tell GCM servers to not send notifications to the current device any more.
Okay, that was the JavaScript part, and it was relatively small. Let's move forward to the contents of notifications.
Sending GCM notifications
There is an official guide how to downstream messages to devices here. However, since Phonegap Push Plugin requires a different set of custom keys, we have to do things slightly different.
To send a push notification to a specific device you must have:
- Google API Key (received in the first part of the article)
- Device Registration ID (received in the second part of the article, when initiating a PushNotification client).
In order to send a notification, you have to make a POST request to https://gcm-http.googleapis.com/gcm/send with the following headers:
Content-Type:application/json
Authorization:key=YOUR_API_KEY_HERE
And JSON body like this:
{
  "to": REGISTER_ID_HERE,
  "data" {
    "image": "http://example.com/cool-image.jpg"
    "title": "Example title",
    "body": "Example message body",
  }
}
Note that all the keys (even such as 'title' and 'message'!) should be sent within the data object. That's because of specificity of Phonegap Push Plugin.
You can check if everything works with the following curl command:
curl --header "Authorization: key=YOUR_API_KEY" --header Content-Type:"application/json" https://gcm-http.googleapis.com/gcm/send -d "{ \"to\" : \"YOUR_DEVICE_REGISTER_ID\", \"data\" : {\"image\": \"http://example.com/cool-image.jpg\", \"title\" : \"Example title\", \"message\" : \"Example message body\"}}"
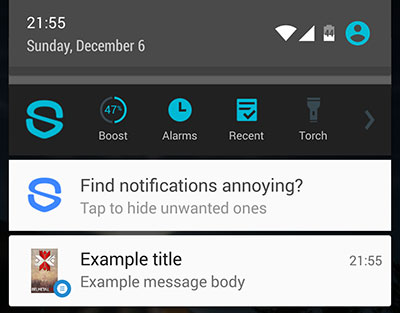
Sending push notifications that appear on your device
The example above shows how to send a simple notification. Pay attention on the image key, which represent the big icon of the notification. You can specify an absolute URL of the image (like in example), relative path to the image in the app ('www/images/notification.png'), or the name of the image (resource) in the drawable folder (for instance, 'notification' would reference '/CordovaProjectRoot/platfroms/android/res/drawable/notification.png'). If nothing is specified, the icon specified in push.init() will be used.
Grouping notifications
Typically, Android devices shows only the last notification. If you want to let your users know that there are more than one, you can stack up to 8 notifications in a box container.
To achieve that, add the following properties:
"data" {
  ...
  "style": "inbox",
  "summaryText": "You have %n% unread notifications.",
} 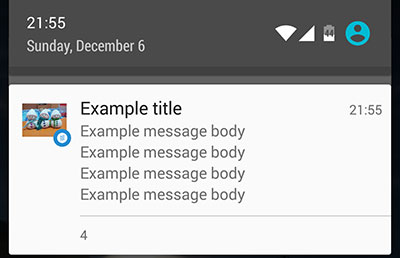
Unfortunately, I couldn't find the way to translate the summary text and display different strings depending on the app/device language. If language is important in your case, I suggest using just a number (%n%).
If your application has different type of notifications that logically cannot be grouped, you can use the 'notId' property.
"data" {
  ...
  "notId": 5,
} 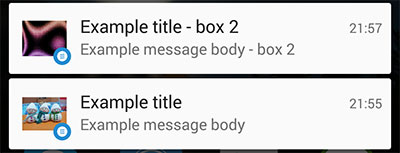
The bigger number you specify, the higher the group will be displayed relatively to the other groups with smaller notId value. It works even without “style: inbox”.
Priority
Another way to sort notifications is to set its priority property which accepts values from -2 to 2.
"data" {
  ...
  "priority": 2, // the highest priority
}
Notifications with high priority will be displayed on the top of the others (including the notifications of the other apps) and probably wake up the device and provide your app with Internet access.
Custom properties
You can pass as many custom properties as you want, and they will be available as data.additionalData in your on('notification') callback.
There are much more possibilities than this such as action buttons, custom notification sounds, displaying big picture in the notification box, etc. I didn't use them in my project, but if you want to find out more, please visit the plugin's documentation
Sending system notifications (that call the on('notification') handler on the background)
As previously mentioned, you can send messages to your app that wouldn't cause any sound or visual affect. You can even assign them high priority, which would get your application connected as soon as possible. Just omit 'title' and 'message' keys in the body of your request. I will probably describe this behavior in more details, but it would take a separate blog post.
Conclusion
I hope now you have an understanding on how GCM notification work and how to implement them in your Cordova Android application. It takes some time to get started, but with all the benefits Google provides, it's worth time investing. Thanks for reading and have fun!