Making a Discord bot with Deno and Discordeno
A few days ago, Deno was released, and I couldn’t resist to try it out. In a nutshell, Deno is a new secure JavaScript and TypeScript runtime that supports importing modules from URLs (npm is no longer needed), has a flexible permission system, modern promise-based APIs and many more goodies.
Even though this is the very first stable release, there are lots of modules written by enthusiasts already available for us to use. In this article, we’ll use Deno and Discordeno library to create a simple discord bot.
What is Discord?
I am not sure that this section is needed, but if you are like me barely familiar with Discord, let us review the basics. Discord is an ultra-popular messaging service, initially targeted on gamers, by thanking to super-user-friendly interface and rich functionality it became a shelter for a lot of different communities – like international software developer communities, Na'Vi language learners, and even Deno official communities. Each registered user can be a member of multiple servers (guilds), chat in channels and directly with channel members, manage friend lists, and create their own servers. As a server administrator, you can control what members can or can’t do by utilising the flexible system of roles and permissions.
From the developer’s perspective, Discord provides a flexible API to handle everything programmatically. It includes the well-known concept of chat-bots where a chat bot can subscribe to a bunch of different events – incoming messages, users joining and leaving channels – and react with the needed action, be it a greeting of newcomers, detecting the trolls and kicking them out, or making some writes to an external database.
At the moment of writing, there are three discord-integration libraries available in deno land: coward , dinocord, and discordeno. In this tutorial, we will be using Discordeno as it seems to be the most actively developing one and has its own bot template to start with.
Getting Started
There are plenty of guides how to create a discord bot, so I’ll be pretty quick here.
- Get registered at Discord if you haven’t already
- Create your Discord server. It can be done right in the welcoming wizard
- Go to the Application page and create a new application. Upon creating, save the Client ID information, as we are going to need it on the bot’s configuration step.
- Create a Discord bot (“Bot” menu item on the left). For testing purposes, give it the “Administrator” access, but be very careful when you will be adding this bot to a real server with real people. Save the bot’s Token. We are going to use it soon as well.
- Invite the bot to your server. Go to the Oauth2 menu item. Check the “bot” checkbox in scopes and “Administrator” in permissions. The invitation link should appear. Copy and paste it in a new browser tab’s address bar.
- In this new tab, select your server, confirm the administrator rights, prove that you are not a bot, and the bot will be added to your server.
Installing Deno and Denon
On Mac OS, you can install Deno with the following command:
curl -fsSL https://deno.land/x/install/install.sh | sh
If that’s not your case, visit deno.land for up to date update installing guide on any platform.
After the installation finishes, you can check if everything worked well by typing deno -V in your terminal and see the version output. Should the deno command still be unavailable, try to open a new terminal window or add ~/.deno/bin to your $PATH environmental variable.
Now let us install Denon. Denon is a CLI tool that restarts your node application every time your change the code (like nodemon) and thereby significantly speeds up the development process. To install, run the following command:
deno install --allow-read --allow-run --allow-write -f --unstable https://deno.land/x/denon/denon.ts
Visit the plugin page to see the up-to-date installation instructions.
Getting started with the Bot template
To get your first Discord bot up and running quickly, the Discordeno developer Skillz4Killz created a bot template. You can start with it, but clicking the Use this template button. It will create a new GitHub repository on your account with the initial commit supplying the contents of this template. Once the repo has been creating, clone it to your file system, and we are ready to go.
Configuring Denon
Before we dive into the code, let’s configure Denon first. Create .denon file in the root directory of the project with the following content (updated for denon 2.0):
{
  "scripts": {
    "start": {
      "cmd": "deno run mod.ts",
      "desc": "Start the bot",
      "unstable": true
    }
  },
  "allow": [
    "read",
    "net",
    "env"
  ]
}
If you decide to access the credentials from the environment variables, you can use the env section of the script. Check out the Github repository on the link below to see how to access the environment variables with Deno.
Configuring the bot
It is time to set up our bot. Remember, we saved Client ID and Token when we were dealing with Discord interface? Now we are going to use it.
In the root of the project, create a file configs.ts with the following content:
export const configs = {
  prefix: "!",
  token: "<YOUR_BOT_TOKEN>",
  botID: "<YOUR_CLIENT_ID>",
}
prefix is a character that will trigger the bot’s actions. It is widely common to use an exclamation mark for this purpose, but you can use any character of your preference – just be sure that it’s rare enough so your bot doesn’t get triggered by mistake.
Let’s start our bot by typing the following command:
denon start
We specified the entry-point and required deno arguments in the .denon file, so it should start as expected. If the bot credentials were specified correctly, you should see the following message:
[READY] Bot is online and ready!
If you open the Discord application, you should also see the that your bot’s online status has become green.

Out of the box, the bot template comes with a sample ping command. Type !ping in the #general Discord channel and the bot will immediately reply with the ping in milliseconds which is the time difference between the moment when the message was sent and the moment when it was received by the bot. If you can see the bot’s response, then well done, you configured everything right, and now you can do some real work.
Saying hello
Let us start simple. Say, we would like our bot to greet the server/guild members when it goes online. The appropriate place to that will be in Guild Create event callback (src/events/guildCreate.ts) as it is called on startup (once per each guild) when the bot receives information about the guilds. Replace the contents of the file with the following:
import { Guild } from "https://raw.githubusercontent.com/Skillz4Killz/Discordeno/v4/structures/guild.ts";
import { ChannelTypes } from "https://raw.githubusercontent.com/Skillz4Killz/Discordeno/v4/types/channel.ts";
import { logGreen } from "https://raw.githubusercontent.com/Skillz4Killz/Discordeno/v4/utils/logger.ts";

export const guildCreate = (guild: Guild) => {
  logGreen(
    `[EVENT=GuildCreate]: ${guild.name} with ${guild.memberCount} members.`,
  );
  for (const channel of guild.channels.values()) {
    if (channel.type !== ChannelTypes.GUILD_TEXT) {
      continue;
    }
    channel.sendMessage('Hello there!');
    break;
  }
};
When the script is recompiled and restarted, you should see the greeting in Discord:

First, we import the Message data structure and the ChannelTypes type from the Discordeno library. See the new importing syntax? That’s the new Deno thing – importing modules from remote URLs. In this example, we’re importing the file from the latest Discordeno v1 codebase available on GitHub.
Note that Deno caches files locally and if you need to reload the dependency (say, when the update to v1 is rolled out), you need to run the app with --reload argument. In our sample project, you will have to add it to the deno_args array in the .denon config file.
Next, we are iterating over the channels, checking if it is a text channel (sending a text message to a voice channel would not make much effect), and sending a message “Hello there”. In case you need to send greetings only to specific channels or specific guilds, you can add additional checks on guild.name and channel.name.
Replying to a Command
Let’s implement one more typical scenario – replying to a command. In order to create a new command, you need to create a new file in src/commands folder. Let’s call our new command “meow” and create src/commands/meow.ts for it. Paste the following code in there:
import { botCache } from "../../mod.ts";

botCache.commands.set('meow', {
  callback: (message) => {
    return message.channel.sendMessage(
      'MEOWWW!!!',
    );
  },
});
In this chunk of code, we are creating a callback that will be triggered in response to the !meow command and adding it to the Map of commands. We do not care about the prefix here as it is checked automatically in the commandHandler more on which below.
After making the changes above, open the Discord app and type !meow in the #general channel. The bot should respond immediately:

What if you would like to have two or more commands for the same function? You can add a command alias in the following way:
botCache.commandAliases.set('meowww', 'meow');
Now when we type the alias command in chat, we will receive the same result without code duplication.
Understanding the bot’s template structure
Now when we have built our first bot command, let’s take a closer look at the project structure to have a better understanding what we can do.
Commands
As you already figured from the examples, this is the place to keep your bot's commands. All files in this directory are imported on start up.
Events
Connect your handlers to Discord events here. See the full list of supported event handlers here (EventHandlers) and check the corresponding page in the Discord documentation.
Inhibitors
This directory contains files with functions that serve as filters that determine whether or not a command should go through in given circumstances. All files in this directory are imported during start up.
Monitors
Folder for event handlers. Check the sample commandHandler (src/monitors/commandHandler.ts) to see how incoming messages are handled and filtered out before reaching the command that we wrote in the previous section.
Types
Put your custom TypeScript types here. Out of the box it includes only one type – Command. Note that Command has some optional properties such as dmOnly (triggered only for direct messages), guildOnly (for server messages) and nsfw (for “not safe for work” channel types). Default inhibitors check for these options and prevent command from running if conditions do not match.
Note that in order to react to direct messages, you need to add Intents.DIRECT_MESSAGES in the BotOptions in mod.ts.
Responding with a Nicely Formatted Message
One of the coolest features of discord is that you can not only respond with a simple text message, but embed a GIF, a YouTube video, or send a nicely formatted structured data. Create a new file at src/commands/embed.ts and add the following code there:
import { Message } from "https://raw.githubusercontent.com/Skillz4Killz/Discordeno/v4/structures/message.ts";
import { botCache } from "../../mod.ts";

export const lastPwnageCommand = (message: Message) => {
  return message.channel.sendMessage(
    {
      embed: {
        title: 'Latest pwnage report',
        type: 'rich',
        description: 'The enemy xKRISATXx has been OWNED!!1',
        url: 'https://adengate.ru/',
        color: 15576321,
        author: {
          name: 'xzxGLADDRUPALPWNZxzx'
        },
        fields: [
          {
            name: 'Class',
            value: 'Adventurist',
            inline: true
          },
          {
            name: 'Level',
            value: '78',
            inline: true
          },
        ]
      }
    }
  );
};

botCache.commands.set(`lastpwnage`, {
  callback: lastPwnageCommand,
});

botCache.commandAliases.set('lp', 'lastpwnage');
Don’t mind the sample text. It refers to late zeros when Lineage 2 was quite popular in our region.
As you can see, here we have created another bot command, !lastpwnage or !lp, which sends a message with a shifty data structure that is displayed in Discord like this:
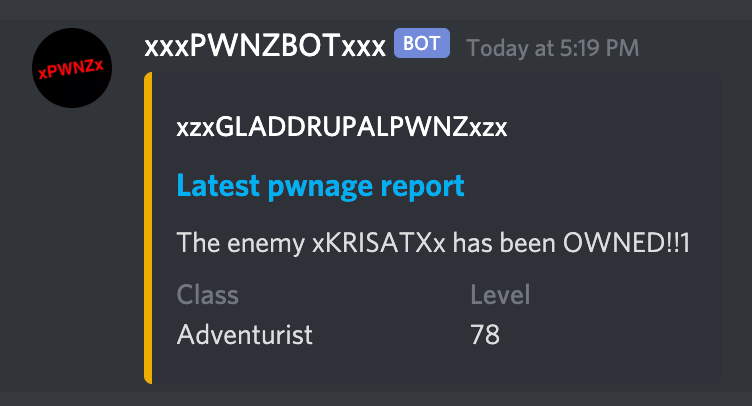
Pretty neat, right?
Note that that we pass the color as a decimal integer whereas typically colors are presented in hexadecimal format. To convert your color, you can simply type it as 0x<COLOR_CODE> to your JavaScript console (just strip the hash character), hit enter and receive the result. Thereby #edad01 is converted to 15576321 which is what we’re sending to Discord. You can also convert it back like this: 15576321..toString(16).
And this is just a surface of the iceberg. There is so much more you can do with a bot in discord – creating and deleting channels, adding and removing members, posting useful real-time about external events. Basically, anything you can do as a Discord user, you can delegate to a bot. The possibilities are endless, and if you feel excited to get started with writing your own Discord bot in Deno, refer to the plugin’s documentation https://github.com/Skillz4Killz/Discordeno, and don’t be afraid to read the source code (with TypeScript, it’s so clear now) because that’s how the learning happens.
You can check the code here. It also contains a few improvements for running the bot in Docker.
Updated 05/26/2020: Fixed denon configuration and code samples due to libraries' API changes
Thanks for reading and see you next time.