Sending responsive HTML emails with Zurb Ink and MailChimp

There's always a lot of beautiful emails in morning inbox - you know, those, with colorful images, green sight-attracting buttons, offering great deals and discounts that expire just a couple of hours. Until recently, I didn't think that I would ever deal with mailing lists, sometimes we come across really unexpected things. Today I needed to create a responsive HTML template for emails and set up a Drupal website for working with MailChimp and providing it a list of users to send letters to. The task itself isn't that difficult, but it includes many steps, that with time, may be forgotten. So I guess this post will be a good reminder for me and hopefully helpful to someone else.
HTML Email Limitations
Unfortunately, the possibilities of email markup are very limited. We cannot even use background images and hover effects, not telling about any advanced CSS features. It allows us using IMG tag though, which, combined with some font styles and efforts, may result our email look pretty.
Email HTML layouts use preferably tables because many mailing clients would fail displaying divs. If you were not coding HTML a decade or two ago, it may seem to you outdated and stupid, but let’s consider it as another experience and opportunity to learn a new bunch of useful skills. Tables can be inserted into another tables, create grids, and eventually look pretty neat. This is exactly what Zurb Ink does.
You also cannot use linked CSS files in your template, so be prepared to use a lot of inline styles.
Using Zurb Ink for Responsive Email
Zurb Ink can be considered a Twitter Bootstrap (or rather Zurb Foundation) for emails. It provides us a cool 12-column grid with many useful HTML classes, defining alignment, padding, creating beautiful buttons and so on. For screens of width less than 580px it would stack vertically displaying the message as a single column table. Zurb Ink has a detailed documentation with examples and code snippets, which may be used well when building your own template. Everything is pretty clear in there, so I suggest you to take a quick look on that page, getting familiar with possibilities of the framework, and periodically getting back to it while coding HTML. Note that out of the box
When your template is ready, you can go to MailChimp website, choose Templates -> Create Template -> Code your own -> Paste in code and paste the code from your IDE. You will see the preview result almost instantly. Note that it may be different from what you had seen in your browser – that’s because many CSS properties and selectors are not allowed in emails. Moreover, the styles that follow after a bad line of code will not be applied to the document. If you’re seeing this, try to “debug” your template by removing suspicious CSS and watching the preview change. If everything normalizes, try to refactor the part you just removed. This is how I figured that using background-image on list items and hover-states on button was definitely not a good idea.
Once your template looks good on the left side of the page, move on and select Preview and Test -> Preview Mode. On the opened page, you will even see what your template would look like on a narrow screen of a cell-phone, which can be a good point to start, but in fact may be different because of the variety of mobile browsers and mail clients.

Dealing with MailChimp

Briefly, MailChimp is an online service that allows us to deal mailing lists with ease. It gives us the possibilities of managing receiver lists and campaigns with cool import/exports mechanisms and third party integrations (including Drupal, on which a little bit later); has awesome statistics and reports, in-browser template constructor, scheduling, automation and so on. Some of these features are paid, but even a free edition provides a cool toolkit to start with.
Setting up Drupal and Mailchimp
Like any other popular online service, MailChimp has its own contributed Drupal module on drupal.org. The core module itself does not make much use for non-developers, as it only exposes to Drupal methods from MailChimp PHP library. However, its submodules are capable of doing much more interesting things. You can read about what exactly they do by following the previous link.
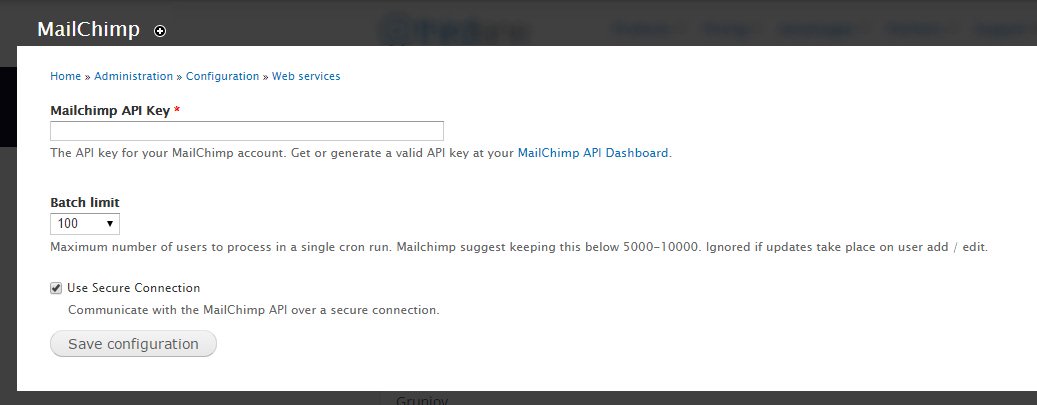
For initial setup, you are going to need to enter your MailChimp API key. Just follow the “admin/config/services/mailchimp” URL on your Drupal website (or use “Configuration » Web services » MailChimp” menu path), and you will see the settings form. Follow the link from the first field’s description and press the Create Key button on the opened page.

Once done, you will see a table, which has an API key column, containing a string of seemingly random characters. Copy this string to the MailChimp API Key field of the MailChimp Settings form on your Drupal website, and you are done – now your website knows how to talk to MailChimp.
So now, you can manage MailChimp’s campaigns and lists right from your Drupal website, but personally, for me the traditional way is more preferable. The main reason why we are setting this up is that now we are able to export any Drupal entity, which has an email field, to MailChimp mailing list. Usually, it affects users, and it comes in handy that it is possible to filter the list to users of specific role(s). For long lists, there is an option to export users bunch by bunch during scheduled cron runs.

To create a new export, you need to create an empty list on MailChimp first. Then click the “Refresh lists from MailChimp“ (to get Drupal to know that a new list exists) and “Add a List” link on the Configuration » Web services » MailChimp » Lists and Users page. Pay special attention to the MAILCHIMP LIST & MERGE FIELDS section, as this is the place, where first and last name fields mapping is set up. If you misconfigure this, your users would not be addressed properly, which is definitely not what you want. I already had these fields in my user register form, so it was an easy step. Going further, you can restrict the list to specific roles, and so on. For adding already existing users to the newly created list, you need to check “Sync List during Cron” and click “Queue existing” link on the general lists page. After doing this, your website users will get a subscription confirmation email and become visible in the mailing list in MailChimp admin panel.
Third party integrations
Beside Drupal, there is a lot of options to import users to MailChimp’s list. One of them is using Zoho CRM leads, which in my case was really-really helpful. In order to do this, you need to select import option in your list’s actions, and then choose Zoho CRM among the available options. Note that here you can import contacts form a TXT/CSV files or a bunch of another online services. In the next step, you will need to provide MailChimp with Zoho username and password, and if they are correct, it will start importing your contacts in a few minutes (this action requires sort of approval). The good side is that the result gets filtered from bad addresses and duplicates, which allows you to get rid of spambot users that may somehow sneak into your precious website.
Ready to Go!
So overall, we have an email template, a mailing list, and are completely ready to send letters massively around the world. Go ahead, create a campaign, follow a simple wizard selecting the proper mailing list and template, push the “Send” button and make glad your subscribers with the important information you have to carry to them.
Hope that this guide was helpful, but if you have any questions, feel free to post them in comments below!